Part 0: Roadmap of this Session
Views in MVC
- Creating and Organizing Views: Using view models and best practices for organizing views.
_Layout.cshtml: Creating reusable layouts for consistent page structure.- Bootstrap Integration: Introduction to Bootstrap and using its grid system, forms, and navigation.
- Razor View Engine: Using Razor for conditional content, loops, and strongly typed views.
- HTML Helpers and Tag Helpers: Leveraging helpers to generate forms, links, and other elements
Part 1: Introduction to Views
In the Model-View-Controller (MVC) pattern, the view handles the app's data presentation and user interaction. A view is an HTML template with embedded Razor markup. Razor markup is code that interacts with HTML markup to produce a webpage that's sent to the client.
In ASP.NET Core MVC, views are .cshtml files that use the C# programming language in Razor markup. Usually, view files are grouped into folders named for each of the app's controllers. The folders are stored in a Views folder at the root of the app:
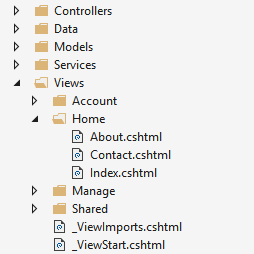
The Home controller is represented by a Home folder inside the Views folder. The Home folder contains the views for the About, Contact, and Index (homepage) webpages. When a user requests one of these three webpages, controller actions in the Home controller determine which of the three views is used to build and return a webpage to the user.
Layouts
Use layouts to provide consistent webpage sections and reduce code repetition. Layouts often contain the header, navigation and menu elements, and the footer. The header and footer usually contain boilerplate markup for many metadata elements and links to script and style assets. Layouts help you avoid this boilerplate markup in your views.
Partial Views
Partial views reduce code duplication by managing reusable parts of views. For example, a partial view is useful for an author biography on a blog website that appears in several views. An author biography is ordinary view content and doesn't require code to execute in order to produce the content for the webpage. Author biography content is available to the view by model binding alone, so using a partial view for this type of content is ideal.
When to use partial views
Partial views are an effective way to:
- Break up large markup files into smaller components.
In a large, complex markup file composed of several logical pieces, there's an advantage to working with each piece isolated into a partial view. The code in the markup file is manageable because the markup only contains the overall page structure and references to partial views.
- Reduce the duplication of common markup content across markup files.
When the same markup elements are used across markup files, a partial view removes the duplication of markup content into one partial view file. When the markup is changed in the partial view, it updates the rendered output of the markup files that use the partial view.
Partial views shouldn't be used to maintain common layout elements. Common layout elements should be specified in _Layout.cshtml files.
Don't use a partial view where complex rendering logic or code execution is required to render the markup. Instead of a partial view, use a view component.
Partial Tag Helper
The Partial Tag Helper requires ASP.NET Core 2.1 or later.
The Partial Tag Helper renders content asynchronously and uses an HTML-like syntax:
<partial name="_PartialName" />
<partial name="~/Views/Folder/_PartialName.cshtml" />
<partial name="/Views/Folder/_PartialName.cshtml" />
Part 2: Razor Syntax
Razor syntax
Razor supports C# and uses the @ symbol to transition from HTML to C#. Razor evaluates C# expressions and renders them in the HTML output.
When an @ symbol is followed by a Razor reserved keyword, it transitions into Razor-specific markup. Otherwise, it transitions into plain HTML.
To escape an @ symbol in Razor markup, use a second @ symbol.
Implicit Razor expressions
Implicit Razor expressions start with @ followed by C# code:
<p>@DateTime.Now</p>
<p>@DateTime.IsLeapYear(2016)</p>
Explicit Razor expressions
Explicit Razor expressions consist of an @ symbol with balanced parenthesis. To render last week's time, the following Razor markup is used:
<p>Last week this time: @(DateTime.Now - TimeSpan.FromDays(7))</p>
Razor code blocks
Razor code blocks start with @ and are enclosed by {}. Unlike expressions, C# code inside code blocks isn't rendered. Code blocks and expressions in a view share the same scope and are defined in order:
@{
    var quote = "The future depends on what you do today. - Mahatma Gandhi";
}

<p>@quote</p>

@{
    quote = "Hate cannot drive out hate, only love can do that. - Martin Luther King, Jr.";
}

<p>@quote</p>
The code renders the following HTML:
<p>The future depends on what you do today. - Mahatma Gandhi</p>
<p>Hate cannot drive out hate, only love can do that. - Martin Luther King, Jr.</p>
In code blocks, declare local functions with markup to serve as templating methods:
@{
    void RenderName(string name)
    {
        <p>Name: <strong>@name</strong></p>
    }

    RenderName("Mahatma Gandhi");
    RenderName("Martin Luther King, Jr.");
}
The code renders the following HTML:
<p>Name: <strong>Mahatma Gandhi</strong></p>
<p>Name: <strong>Martin Luther King, Jr.</strong></p>
Control structures
Control structures are an extension of code blocks. All aspects of code blocks (transitioning to markup, inline C#) also apply to the following structures:
Conditionals @if, else if, else, and @switch
@if controls when code runs:
@if (value % 2 == 0)
{
    <p>The value was even.</p>
}
else and else if don't require the @ symbol:
@if (value % 2 == 0)
{
    <p>The value was even.</p>
}
else if (value >= 1337)
{
    <p>The value is large.</p>
}
else
{
    <p>The value is odd and small.</p>
}
The following markup shows how to use a switch statement:
@switch (value)
{
    case 1:
        <p>The value is 1!</p>
        break;
    case 1337:
        <p>Your number is 1337!</p>
        break;
    default:
        <p>Your number wasn't 1 or 1337.</p>
        break;
}
Looping @for, @foreach, @while, and @do while
@for
@for (var i = 0; i < people.Length; i++)
{
    var person = people[i];
    <p>Name: @person.Name</p>
    <p>Age: @person.Age</p>
}
@foreach
@foreach (var person in people)
{
    <p>Name: @person.Name</p>
    <p>Age: @person.Age</p>
}
@while
@{ var i = 0; }
@while (i < people.Length)
{
    var person = people[i];
    <p>Name: @person.Name</p>
    <p>Age: @person.Age</p>

    i++;
}
Part 3: Bootstrap and Frontend development
What is Bootstrap?
- Bootstrap is a free front-end framework for faster and easier web development
- Bootstrap includes HTML and CSS based design templates for typography, forms, buttons, tables, navigation, modals, image carousels and many other, as well as optional JavaScript plugins
- Bootstrap also gives you the ability to easily create responsive designs

Part 4: Tag Helpers and HTML Helpers
Tag Helpers and HTML Helpers in ASP.NET Core
Tag Helpers and HTML Helpers are features of ASP.NET Core MVC used to simplify the creation of dynamic HTML content in Razor views. Both are tools for generating HTML but differ in syntax, approach, and usability.
1. Tag Helpers
What Are Tag Helpers?
Tag Helpers are server-side components in ASP.NET Core that help you generate and manipulate HTML elements using a natural and familiar syntax that resembles standard HTML.
Key Characteristics:
- Blend seamlessly with standard HTML.
- Use attributes to bind data or add functionality.
- Processed on the server and output pure HTML.
Examples of Tag Helpers
-
Anchor Tag Helper (
<a>)
<a asp-controller="Home" asp-action="About" class="btn btn-primary">Go to About</a>asp-controller: Specifies the controller (Home).asp-action: Specifies the action (About).- This generates:
<a href="/Home/About" class="btn btn-primary">Go to About</a>
-
Form Tag Helper
<form asp-controller="Account" asp-action="Login" method="post"> <input type="text" name="username" /> <button type="submit">Login</button> </form>- Automatically generates the form's
actionattribute based on the controller and action.
- Automatically generates the form's
-
*Input Tag Helper
<input asp-for="UserName" class="form-control" />asp-for: Binds the input element to theUserNameproperty of the model.
-
Validation Tag Helpers
<span asp-validation-for="Email" class="text-danger"></span>- Displays validation messages for the
Emailproperty.
- Displays validation messages for the
How Tag Helpers Work
- Tag Helpers are identified by their attributes, like
asp-controllerorasp-for. - These attributes are processed on the server to generate the appropriate HTML.
Configuration:
Tag Helpers are enabled globally in Razor views by default using the _ViewImports.cshtml file:
@addTagHelper *, Microsoft.AspNetCore.Mvc.TagHelpers
Benefits:
- Intuitive and HTML-like syntax.
- Cleaner and more readable Razor views.
- Easier to maintain and debug.
2. HTML Helpers
What Are HTML Helpers?
HTML Helpers are server-side C# methods that generate HTML elements dynamically. They are written in Razor syntax (@Html.*) and allow you to create UI components programmatically.
Key Characteristics:
- Written as C# methods.
- More explicit than Tag Helpers.
- Processed on the server and output HTML.
Examples of HTML Helpers
-
Anchor Links (
Html.ActionLink)@Html.ActionLink("Go to About", "About", "Home", null, new { @class = "btn btn-primary" })- Generates:
html
<a href="/Home/About" class="btn btn-primary">Go to About</a>
- Generates:
html
-
Forms (
Html.BeginForm)razor
@using (Html.BeginForm("Login", "Account", FormMethod.Post)) { @Html.TextBoxFor(m => m.UserName, new { @class = "form-control" }) <button type="submit">Login</button> }- Generates:
<form action="/Account/Login" method="post"> <input class="form-control" id="UserName" name="UserName" type="text" value=""> <button type="submit">Login</button> </form>
- Generates:
-
Input Fields (
Html.TextBoxFor)@Html.TextBoxFor(m => m.Email, new { @class = "form-control" })- Generates:
<input class="form-control" id="Email" name="Email" type="text" value="">
- Generates:
-
Validation Messages
@Html.ValidationMessageFor(m => m.Email, null, new { @class = "text-danger" })- Displays validation messages for the
Emailproperty.
- Displays validation messages for the
How HTML Helpers Work
- They are methods in the
System.Web.Mvc.HtmlHelperclass. - Use lambda expressions to bind data to model properties.
Benefits:
- Provide programmatic control over HTML generation.
- Allow detailed customization using C#.
Comparison: Tag Helpers vs. HTML Helpers
| Feature | Tag Helpers | HTML Helpers |
|---|---|---|
| Syntax | HTML-like attributes | C# method calls |
| Readability | Cleaner and more intuitive | Less readable in complex scenarios |
| Usage | Uses attributes like asp-for |
Uses Razor methods like Html.TextBox |
| Configuration | Requires _ViewImports.cshtml setup |
No special configuration required |
| Flexibility | Easier to extend and customize | More explicit but less integrated |
| Examples | <input asp-for="Email" /> |
@Html.TextBoxFor(m => m.Email) |
Best Practices
- Use Tag Helpers for modern, clean, and readable Razor views.
- Use HTML Helpers for scenarios requiring complex C# logic or when you prefer programmatic control.
- Avoid mixing both approaches in the same view for consistency.